Time to cook: 120min
Difficulty: +++++
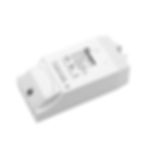
The Sonoff POW R2 is a low cost (about 10€) connected WiFi switch able to remotely manage and control your appliances and allow you to monitor your home energy usage. The connected WiFi switch reports on power consumption, voltage and real-time current.
Ingredients
Sonoff POW R2
Prerequisites
Tools
Arduino IDE
NodeMCU PYflasher
FDDI to USB module
Intro
The Sonoff controller is based on the popular ESP8266 WiFI module and made by the chinese manufacturer itead that provides users with smart home control. The POW version is a wireless connected power switch with electricity usage monitor feature.
The Sonoff comes with its own firmware that can be controlled by Iteads App EWeLink.
Theo Arends (from the Netherlands) has created an alternative firmware on top of the popular Sonoff. The Alternative firmware for ESP8266 based devices provides a web UI, rules and timers, OTA updates, custom device templates and sensor support. The firmware allows control over MQTT, HTTP, Serial and KNX for integrations with various platforms. The firmware is written for the Arduino IDE which makes it easy to use.
This alternative Sonoff-Tasmota firmware is ideal for our system-of-systems approach where we can use data communication protocols such as MQTT.
The Building Plan
Updating the firmware
When you order the Sonoff POW, it has the itead firmware installed. The first thing we will do is to replace it with the Sonoff-Tasmota firmware from Theo Arends.

To be able to upload new firmware on to the Sonoff Pow, we need to Solder a header pin on the PCB and connect a serial-to-USB converter TX and RX pins to the ESP8266 RX and TX pins and powering the chip with the 3.3V and GND pins
IMPORTANT!: Make sure the Sonoff-Pow is NOT connected to the MAINS power!
More info about the hardware preparation can be found here
Next connect the FDDI to USB module to the pin header following the table below

Now we can flash the new firmware on the device. Either you can compile the Tasmota software using an Arduino IDE and upload it onto the board. Another and easier way is to download a ready-to-use binary file and upload it using the NodeMCU PyFlasher.
Download a ready to use bin file from: https://github.com/arendst/Tasmota/releases/
(tasmota.bin is the most appropriate in many cases)
Download NodeMCU PyFlasher and install it on your computer
Press the S1 button on the Sonoff device while powering on the device, the RED led should be permanent ON.
Select the serial port
Select the bin file (example: sonoff.bin is the most appropriate in many cases)
set flash mode to DOUT
If it is a virgin device, select erase Flash : No
Click on Flash NodeMCU

If the flash was successful the console will display:

Set up the WiFi configuration
When you reboot the Sonoff, it will power up in WiFi APN mode.
example: sonoff-2816

Connect your PC to the WiFi APN and enter your local WiFI SSID and password.

When done, the device will reboot and receive an IP address within your local IP range.
Browse to it’s IP address. You should see the following webpage, which runs from the Sonoff-Pow

You can perform a basic test by pressing the Toggle button, the relay on the device should switch on/off. Now we have successfully installed the Tasmota firmware on the Sonoff-Pow and are able to control the switch from your browser.
Power Management
Now we can control the basics, let’s configure the power management. When we uploaded the firmware, the device was installed with a generic profile. The Sonoff POW version is capable of monitoring the energy consumption, voltage and real-time current. To be able to use these features, we have to change the profile in the device configuration.
Open your browser and enter the IP address of the device.
Select configuration from the menu
Select Configure Module
In Module Type, select Sonoff POW R2
Click save
The Device will now restart and after a few seconds, you should see the new interface reporting on its’ current power consumption.

The device is now capable to measure the power consumption from any appliance. For example insert the device between the power outlet and a lamp. You will be able to measure the power consumption of the lamp. Example a 60W light bulb should report approx 60 power consumption.
You can stop here if you want and browse to the device to control the state and read the power consumption. In the next step we are going to integrate the sonoff Pow with our Smart HUB.
Integrating Sonoff POW with the Smart HUB
The Sonoff POW has the capabilities to report it’s power consumption and other values over MQTT, reversely we can control the Sonoff Pow over MQTT. Again a nice good example how MQTT can be used as the ‘glue’ in a system of systems architecture. MQTT is the preferred way to setup communication within IoT because of its scalable and lightweight protocol optimized for constrained networks.
The image below shows the configuration UI for the MQTT part on the Sonoff-Pow when flashed with the Sonoff-Tasmota firmware.
In this recipe we will connect the Sonoff-Pow with an MQTT broker installed on our openHAB Hub (this is covered in the next section of this recipe)
The Host should point to the Smart HUB on which we installed the Mosquitto broker. If you used another system, you must point to that system. (enter the IP address or local DNS name.
MQTT uses the default port 1883.
The Client can be any random name
The User and Password should match the Username and Password used to setup the MQTT broker on the Smart HUB, if you used any authentication, which I would recommend to do so.

Sonoff will subscribe to topics to receive control commands . It will also publish status information to topics. Deciding on the topic structure is an important part of the configuration.
Each Sonoff device has a unique name which you configure in the topic section ( shown above) and is represented by %topic%.
This name will reflect the use of the device and should be meaningful e.g
main-light, outside-light etc
The Sonoff-Tasmota firmware supports by default the prefix values cmnd, stat and tele.
cmnd is typically used to send a command to the device
stat is typically used to report the state of the device
tele is used to report stats or sensor data, such as power or energy consumption
The payload data is structured in Json format. Some examples are given below using the default full topic structure %prefix%%topic% :
example tele/%topic%/STAT
{ "Time": "2019-09-07T10:01:26", "ENERGY": { "TotalStartTime": "2019-09-05T14:49:03", "Total": 1.942, "Yesterday": 1.525, "Today": 0.418, "Period": 3, "Power": 172, "ApparentPower": 173, "ReactivePower": 0, "Factor": 0.99, "Voltage": 229, "Current": 0.757 } }
example: tele/%topic%/SENSOR
{ "Time": "2019-09-07T10:02:44", "ENERGY": { "TotalStartTime": "2019-05-16T13:05:18", "Total": 0.423, "Yesterday": 0, "Today": 0, "Period": 0, "Power": 0, "ApparentPower": 0, "ReactivePower": 0, "Factor": 0, "Voltage": 0, "Current": 0 } }
cmnd/%topic%/POWER
{ "POWER": "ON" }
stat/%topic%/POWER
{ "POWER": "ON" }
If you want you can adopt the topic structure to meet your convention, but for most use-cases the default will do.
Adding the Sonoff Pow to OpenHAB
To add the Sonoff Pow as an (MQTT) thing on OpenHAB, you can either create the MQTT thing manual, or use a file like the one below and put in under /etc/openhab2/things.
Note: Most configuration can be done through files which are structured in folders under /etc/openhab2
In this recipe we are going to use the latter one, as there are many items to configure, it’s easier to work with a file.
The first part defines the MQTT broker. The second part defines the Sonoff POW MQTT thing. The stateTopic structure should meet the convention you have adopted for the MQTT topics.
Bridge mqtt:broker:MosquittoMqttBroker "Mosquitto MQTT Broker" @ "MQTT" [ host="127.0.0.1", secure=false, port=1883, qos=0, retain=false, clientid="Oh2Mqtt2Thing", //certificate="", //certificatepin=false, //publickey="", //publickeypin=false, keep_alive_time=30000, reconnect_time=60000, //lastwill_message="", //lastwill_qos=1, //lastwill_topic="", username="<enter the MQTT user name>", password="< enter the MQTT password>" ] { // Sonoff Pow Garden Thing mqtt:topic:sonoff_pow_garden "Sonoff POW Garden" (mqtt:broker:MosquittoMqttBroker) @ "MQTT" { Channels: Type switch : switch "Power Switch" [ stateTopic="stat/sonoff_pow_garden/POWER", commandTopic="cmnd/sonoff_pow_garden/POWER", //retained=false, //postCommand="", //transformationPattern="JSONPATH:$.POWER", //formatBeforePublish="%s", on="ON", off="OFF" ] Type number : Voltage "Voltage" [ stateTopic="tele/sonoff_pow_garden/SENSOR", transformationPattern="JSONPATH:$.ENERGY.Voltage" ] Type number : Current "Current" [ stateTopic="tele/sonoff_pow_garden/SENSOR", transformationPattern="JSONPATH:$.ENERGY.Current" ] Type number : Power "Power" [ stateTopic="tele/sonoff_pow_garden/SENSOR", transformationPattern="JSONPATH:$.ENERGY.Power" ] Type number : Today "Energy Today" [ stateTopic="tele/sonoff_pow_garden/SENSOR", transformationPattern="JSONPATH:$.ENERGY.Today" ] Type number : Yesterday "Energy Yesterday" [ stateTopic="tele/sonoff_pow_garden/SENSOR", transformationPattern="JSONPATH:$.ENERGY.Yesterday" ] Type number : Total "Energy Total" [ stateTopic="tele/sonoff_pow_garden/SENSOR", transformationPattern="JSONPATH:$.ENERGY.Total" ] Type string : wifi-ap "Wifi AP" [ stateTopic="tele/sonoff_pow_garden/STATE", transformationPattern="JSONPATH:$.Wifi.AP" ] Type string : wifi-ssid "Wifi SSID" [ stateTopic="tele/sonoff_pow_garden/STATE", transformationPattern="JSONPATH:$.Wifi.SSId" ] Type string : wifi-channel "Wifi Channel" [ stateTopic="tele/sonoff_pow_garden/STATE", transformationPattern="JSONPATH:$.Wifi.Channel" ] Type string : wifi-rssi "Wifi RSSI" [ stateTopic="tele/sonoff_pow_garden/STATE", transformationPattern="JSONPATH:$.Wifi.RSSI" ] Type string : uptime "Uptime" [ stateTopic="tele/sonoff_pow_garden/STATE", transformationPattern="JSONPATH:$.Uptime" ] Type string : time "Time" [ stateTopic="tele/sonoff_pow_garden/STATE", transformationPattern="JSONPATH:$.Time" ] } }
By adding the file to the Things folder, the device and it’s assets are automatically created on our Smart HUB. They act as a digital representative of the physical device. Each time the device publishes on one of the MQTT topics the data is shown in the corresponding item.
Reporting the energy usage
Now we have set up the Sonoff Pow device as an energy meter and aggregated the data on the Smart HUB, we can visualize the data in the Control dashboards of OpenHAB. The image below shows the Sonoff device which is used to measure the power consumption of a household Dryer.
.

In this Cookbook there are other recipes covering how to visualize the Data using Node-RED from a Sonoff device and examples how you can use the Sonoff energy monitoring to notify someone when the Dryer has finished.